rmoff

May 9, 2018

Blogging v2

Filed under: blogging — rmoff @ 16:52

So the last post here was in 2011…seven years later I should probably post again, just to point random Google visitors to :

November 28, 2011

Blogging

Filed under: obiee — rmoff @ 14:49

I will now be blogging mostly over at the venerable blog of my employer, Rittman Mead.

You can see my first posting here: Web Services in BI Publisher 11g.

Don’t entirely exclude this rnm1978 blog from your feeds, as I may still post more esoteric and random tidbits here.

October 10, 2011

Instrumenting OBIEE – the final chapter


This article has been superseded by a newer version: Instrumenting OBIEE Database Connections For Improved Performance Diagnostics


(Previously on this blog: 1, 2, 3)

Summary

Instrument your code.
Stop guessing.
Make your DBA happy.
Make your life as a BI Admin easier.

The Problem

OBIEE will typically connect to the database using a generic application account.
(Hopefully, you’ll have isolated it to an account used only for this purpose – if you haven’t, you should.)

The problem is that you lose a lot of visibility of work both up and down the stack.

  • An OBIEE query is causing a problem on the database – how do you identify the originator?
  • You want to investigate the performance of an OBIEE query, but how do you identify which DB session it is?
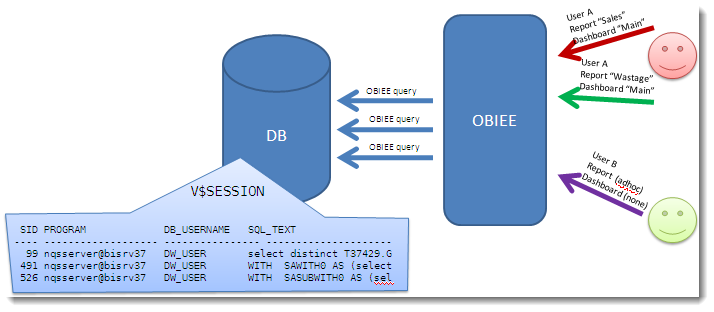
We know SID 491 is causing a problem, but how do we identify the originating OBIEE user?

You could start piecing together Usage Tracking and NQQuery.log files, but it’s hardly convenient or instantaneous is it?

The solution

By taking advantage of native Oracle procedures, we can instrument our OBIEE code to pass through lots of valuable information:
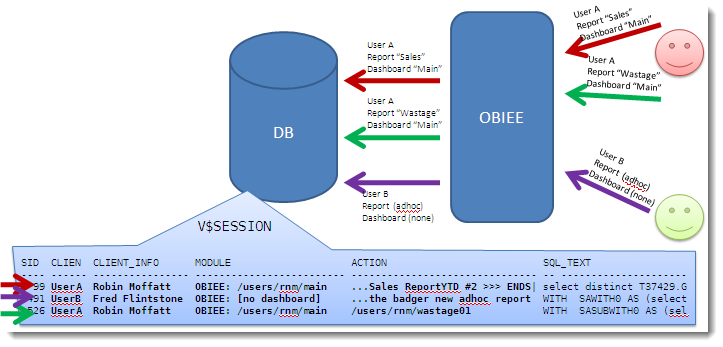
Now we can see which OBIEE user fired the query resulting in SID 491, and not only the user, but the dashboard and request name they are running.

This works in both OBIEE 10g and 11g.

See my previous post here for further background, and discussion of the procedures used.

Implementing it – overview

In essence, we harness internal OBIEE session variables which hold the user ID, name, dashboard and report name. We put a set of database calls on the connection pool(s) associated with query requests.

We have to do a bit of trickery to work around two issues.

Firstly, the variables may not be set (you may not have saved your new request yet, or may be running it outside of a dashboard). To get around this, we create two dummy session variables with the same names, and populate them with dummy init blocks.

Secondly, there is a limitation to the number of characters that can be passed through, and so we manipulate the string if necessary to use the right-most characters.

Implementing it – Init Block and Dummy Variables

Summary:

Create two init block/session variable pairs:

Session Variables

Initialisation Blocks

Be sure to use a connection pool which isn’t used for queries.

Step-by-step

Load up your RPD. If you haven’t already, create a new connection pool that is just for these init blocks. It can be to any database – in the examples below it’s an Oracle one, but any that supports selecting from a dummy table like DUAL in Oracle.

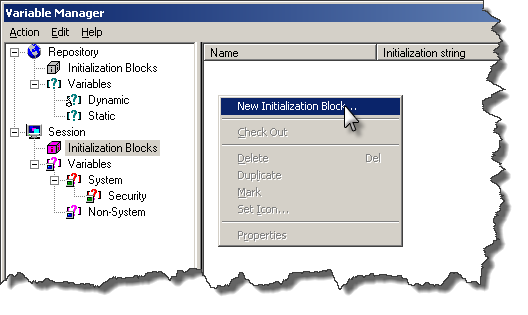
Go to Manage -> Variables, click on Session -> Initialisation Blocks. Right click in the section to the right, and select New Initialization Block.
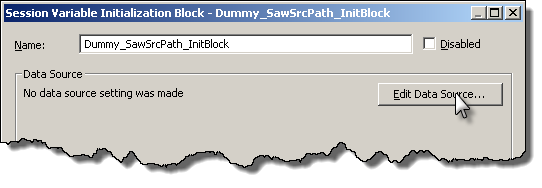
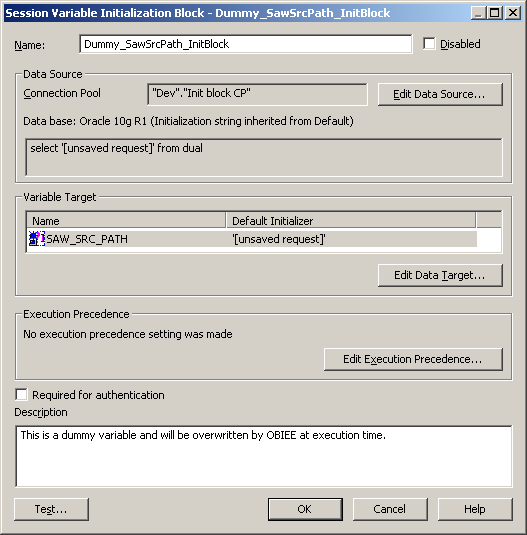
Call the init block Dummy_SawSrcPath_InitBlock, and then click on “Edit Data Source”
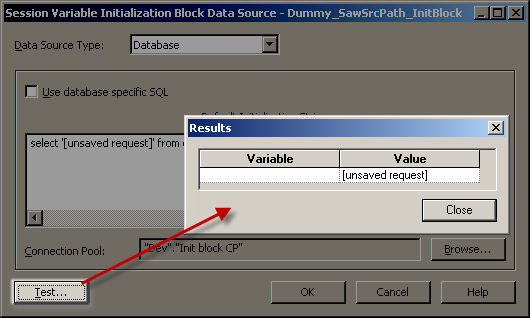
Set the Data Source Type to Database, and the init string to

select '[unsaved request]' from dual

Click on Browse to set the Connection Pool used. The connection pool should be one exclusively for init blocks (not the same you use for queries). If you try to use the same connection pool as for queries, you’ll most likely get an error when you logon.

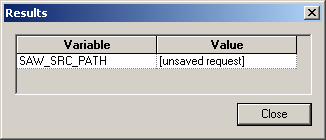
Once you’ve set the connection pool, click on Test – you should get a result as shown:
If the Test doesn’t succeed then you need to fix the problem before you continue.

Assuming it’s worked, click OK to return to the Init Block creation window. We now want to define the dummy variable, so to do so click on “Edit Data Target”:
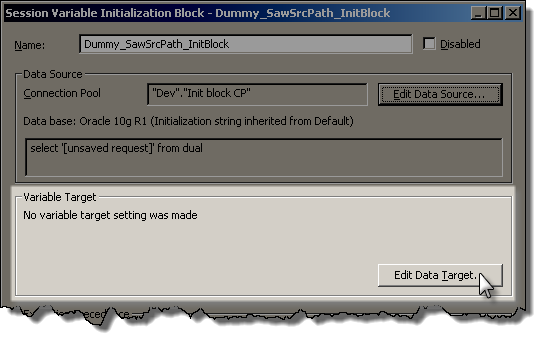
Click on New to create a new variable, and give it the name SAW_SRC_PATH. Make sure you get the name exactly correct, no typos.
Give it a default initializer, and then click OK.
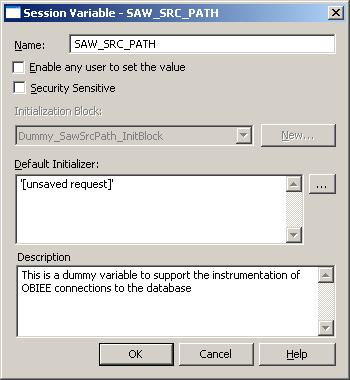
Make sure your init block setup now looks like this:
Click on Test, and expect to get this returned:
Assuming it works, then click OK to save the new Init Block and Variable.

Repeat as above to create an init block/variable pair for SAW_DASHBOARD, looking like this:
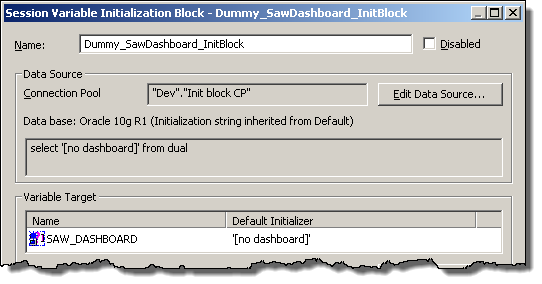
When you’ve finished, you should have two init block/variables pairs set up like this:

Session Variables

Initialisation Blocks

Implementing it – connection pool

Add these three SQL statements to the “Execute before query” of “Connection Scripts” of each Connection Pool which is used for queries.
Do not add them to ones which are used for init blocks / authentication etc.

call dbms_application_info.set_client_info(client_info=>'VALUEOF(NQ_SESSION.DISPLAYNAME)')
call dbms_session.set_identifier('VALUEOF(NQ_SESSION.USER)')
call dbms_application_info.set_module(module_name=>'OBIEE: ' || case when length('VALUEOF(NQ_SESSION.SAW_DASHBOARD)')<40 then 'VALUEOF(NQ_SESSION.SAW_DASHBOARD)' else '...' || substr('VALUEOF(NQ_SESSION.SAW_DASHBOARD)',-37) end,action_name=>case when length('VALUEOF(NQ_SESSION.SAW_SRC_PATH)')<31 then 'VALUEOF(NQ_SESSION.SAW_SRC_PATH)' else '...' || substr('VALUEOF(NQ_SESSION.SAW_SRC_PATH)',-28) end);
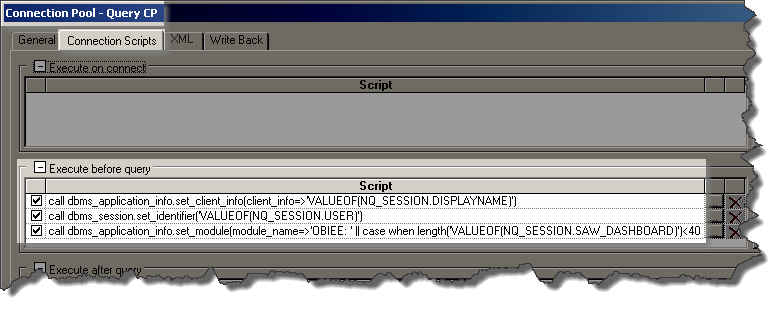
This sets values as follows:

  • Client Identifier is the OBIEE login user id
  • Client Info is the user’s display name.
  • Module and Action are populated with the dashboard name (prefixed by “OBIEE”) and report names respectively, truncated to the left if necessary to fit into the field size.

NB CLIENT_IDENTIFIER and CLIENT_INFO have a larger capacity so could be used if you want to view more of the report/dashboard detail:

V$SESSION column      Max value length
MODULE                47
ACTION                31
CLIENT_INFO           63
CLIENT_IDENTIFIER     63

Reference:
DBMS_APPLICATION_INFO
DBMS_SESSION

Testing the changes

If you’re currently logged into Answers, logout and log back in. This is necessary for the dummy session variables to populate.

Run this sql*plus SQL script below to look at any existing OBIEE queries running on the database.


set linesize 170
col program for a30
col client_info for a20
col client_identifier for a18
col module for a47
col action for a31

SELECT SID,PROGRAM, CLIENT_IDENTIFIER, CLIENT_INFO, MODULE, ACTION FROM V$SESSION WHERE LOWER(PROGRAM) LIKE 'nqsserver%';

Now login to Answers, and run an existing report, or create a new one. When you re-run the SQL script you should see your session now listed:

Not a fan of sql*plus?

If for some strange reason you don’t love sql*plus, you can obviously use the above SQL in any other SQL client. Or, you can fire up Enterprise Manager and see the same set of information:
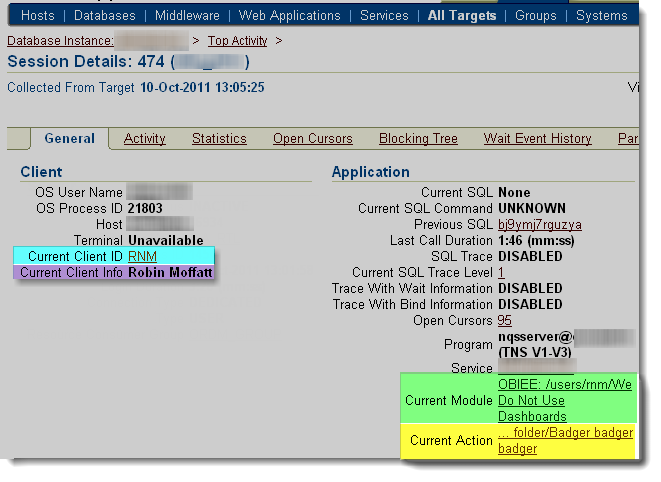
(run at a different time from the SQL above, so different report and dashboard names)

Warning

It’s occurred to me that by parsing in user-provided values to a string that’s executed on the database, there could be the potential for a breach through SQL Injection via a maliciously named report or dashboard.

I’ve not been able to find a report name which does cause trouble, but I have never tried exploiting SQL injection before.

It is another good reason to make sure that you’re using a DB account solely created for reporting queries from OBIEE, because then its privileges can be greatly restricted. This isn’t an excuse not to test for SQL Injection, but a reminder of why good practices such as granting of least privileges exist.

Troubleshooting

  • Make sure you don’tsuffix the database calls with semi-colons (statement terminators). If you do you’ll probably get an error like this:
    [nQSError: 17001] Oracle Error code: 911, message: ORA-00911: invalid character at OCI call OCIStmtExecute
    
  • If you’re having problems implementing this, or doing further playing around with it, you can see the exact SQL that’s executed on connection by bumping up LOGLEVEL and checking NQQuery.log.
  • Don’t use the same connection pool for the init blocks as you do for queries. If you try this, then the init blocks will fire and try to submit a command on the database which requires the variables that the very init blocks are trying to populate. Confused? OBIEE certainly will be too.
  • If someone creates a report or dashboard with single quote in the name, it causes problems. The error will be ambiguous too:

    State: HY000. Code: 10058. [NQODBC

October 5, 2011

OBI 11g : UPGAST-00055: error reading the Oracle Universal Installer inventory

Filed under: Inventory, obiee 11g, oui — rmoff @ 10:56

It’s not my fault really.

When running an installation, presented with the option of

  • (a) do a bunch of stuff and wait to continue the install later or
  • (b) tick a box and continue now

it’s a better man that I who would opt for option (a).

When I recently installed OBIEE 11g, I was prompted to get a script run as root to set up the inventory, or tick “Continue Installation with local inventory” to continue with the install.

Not having root privileges on the machine, not really understanding the purpose of OUI inventory on a single installation machine, and mostly just being a bit lazy, I obviously went for the path of least resistance.

Lazy people click here

The installation proceeded with no further issues, and I spent a couple of happy hours tinkering with the freshly installed OBI 11g and EM.

But… you cross the gods of OUI’s inventory at your peril…

When I tried to run the Upgrade Assistant, got an error:

/app/oracle/product/fmw_home/Oracle_BI1/bin $./ua
Oracle Fusion Middleware Upgrade Assistant 11.1.1.5.0
Log file is located at: /app/oracle/product/fmw_home/Oracle_BI1/upgrade/logs/ua2011-10-05-08-53-26AM.log
UPGAST-00055: error reading the Oracle Universal Installer inventory
The inventory pointer location /etc/oraInst.loc is either not readable or does not exist

Sure enough, the file doesn’t exist:

$ls -l /etc/oraInst.loc
ls: /etc/oraInst.loc: No such file or directory

Fortunately it appears you can make amends with OUI easily, by running as root the script which you were originally asked to run:

[root@server]/ $/app/oracle/product/oraInventory/createCentralInventory.sh
Setting the inventory to /app/oracle/product/oraInventory
Setting the group name to biadmin
Creating the Oracle inventory pointer file (/etc/oraInst.loc)
Changing permissions of /app/oracle/product/oraInventory to 770.
Changing groupname of /app/oracle/product/oraInventory to biadmin.
The execution of the script is complete

This creates /etc/oraInst.loc, which simply points to the original local inventory which was created:

$cat /etc/oraInst.loc
inventory_loc=/app/oracle/product/oraInventory
inst_group=biadmin

After this the Upgrade Assistant fired up just fine.

September 26, 2011

Sourcecode markup tweaks in WordPress

Filed under: wordpress — rmoff @ 14:14

I noticed in Ed Stevens’ blog posting here that some sourcecode he’d posted had certain lines highlighted.

WordPress provides the sourcecode tag for marking up sourcecode in blog posts.
For example:

cd /some/random/folder
ls -l
# do not run this next line!

is much better presented as:

cd /some/random/folder
ls -l
# do not run this next line!

by wrapping it in [sourcecode] tags

I’ve known about the language=’xx’ attribute that you can use with the tag, but Ed’s posting prompted me to check on the syntax and it turns out there a few tweaks one can use. Some of them are illustrated below. The list is taken from WordPress’ Posting Source Code reference page.

[sourcecode] …. [/sourcecode]

#REF: http://en.support.wordpress.com/code/posting-source-code/
#
# This is some dummy source code to illustrate sourcecode posting on wordpress
# Line 2
# Line 3
cd /some/random/folder
ls -l
# do not run this next line!
rm -rf /some

[sourcecode language=bash] …. [/sourcecode]

#REF: http://en.support.wordpress.com/code/posting-source-code/
#
# This is some dummy source code to illustrate sourcecode posting on wordpress
# Line 2
# Line 3
cd /some/random/folder
ls -l
# do not run this next line!
rm -rf /some

[sourcecode gutter=false] …. [/sourcecode]

#REF: http://en.support.wordpress.com/code/posting-source-code/
#
# This is some dummy source code to illustrate sourcecode posting on wordpress
# Line 2
# Line 3
cd /some/random/folder
ls -l
# do not run this next line!
rm -rf /some

[sourcecode collapse=true] …. [/sourcecode]

#REF: http://en.support.wordpress.com/code/posting-source-code/
#
# This is some dummy source code to illustrate sourcecode posting on wordpress
# Line 2
# Line 3
cd /some/random/folder
ls -l
# do not run this next line!
rm -rf /some

[sourcecode highlight=3,5,6,8] …. [/sourcecode]

#REF: http://en.support.wordpress.com/code/posting-source-code/
#
# This is some dummy source code to illustrate sourcecode posting on wordpress
# Line 2
# Line 3
cd /some/random/folder
ls -l
# do not run this next line!
rm -rf /some

[sourcecode firstline=42] …. [/sourcecode]

#REF: http://en.support.wordpress.com/code/posting-source-code/
#
# This is some dummy source code to illustrate sourcecode posting on wordpress
# Line 2
# Line 3
cd /some/random/folder
ls -l
# do not run this next line!
rm -rf /some

[sourcecode padlinenumbers=3] …. [/sourcecode]

#REF: http://en.support.wordpress.com/code/posting-source-code/
#
# This is some dummy source code to illustrate sourcecode posting on wordpress
# Line 2
# Line 3
cd /some/random/folder
ls -l
# do not run this next line!
rm -rf /some

[sourcecode toolbar=false] …. [/sourcecode]

#REF: http://en.support.wordpress.com/code/posting-source-code/
#
# This is some dummy source code to illustrate sourcecode posting on wordpress
# Line 2
# Line 3
cd /some/random/folder
ls -l
# do not run this next line!
rm -rf /some

[sourcecode light=true language=’bash’] …. [/sourcecode]

#REF: http://en.support.wordpress.com/code/posting-source-code/
#
# This is some dummy source code to illustrate sourcecode posting on wordpress
# Line 2
# Line 3
cd /some/random/folder
ls -l
# do not run this next line!
rm -rf /some

Oracle – tnsping – Message 3513 not found; product=NETWORK; facility=TNS

Filed under: windows, XE 11gR2 — rmoff @ 11:38

Short note to record this, as Google drew no hits on it.

Windows XP machine with existing Oracle 11.1 client installation, all working fine.

Installed Oracle 11.2 XE, and started getting these errors:

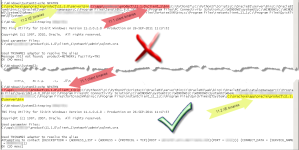
C:\Windows\System32>tnsping DBNAME

TNS Ping Utility for 32-bit Windows: Version 11.2.0.2.0 - Production on 26-SEP-2011 11:01:11

Copyright (c) 1997, 2010, Oracle.  All rights reserved.

Used parameter files:
C:\app\userid\product\11.1.0\client_1\network\admin\sqlnet.ora


Used TNSNAMES adapter to resolve the alias
Message 3513 not found;  product=NETWORK; facility=TNS
OK (20 msec)

Also got these errors from a previously-functioning ODBC query in Excel when I tried to refresh it:

  • [Microsoft][ODBC driver for Oracle][Oracle]
  • [Microsoft][ODBC Driver Manager] Driver’s SQLSetConnectAttr failed

Google drew a blank on “Message 3513 not found”, but with a bit of guidance from Ed Stevens’ and Charles Hooper’s blogs I checked my PATH variable and found this:

C:\Windows\System32>set
[...]
ORACLE_HOME=C:\app\userid\product\11.1.0\client_1\
[...]
Path=C:\oraclexe\app\oracle\product\11.2.0\server\bin;C:\app\userid\product\11.1.0\client_1\bin;C:\Python27\;C:\Python27\Scripts;C:\OracleBI\server\Bin;C:\OracleBI\web\bin;C:\OracleBI\web\catalogmanager;C:\Program Files\Java\jdk1.6.0_26\bin;C:\WINDOWS\system32;C:\WINDOWS;C:\WINDOWS\System32\Wbem;[...]
[...]
TNS_ADMIN=C:\app\userid\product\11.1.0\client_1\network\admin
[...]

PATH is evaluated in order, left to right. Note that the 11.2 XE binaries are now listed before the 11.1 client binaries.

So whilst the TNS_NAMES and ORACLE_HOME are still for the 11.1 client, it looks like I’m invoking the 11.2 binaries for tnsping and presumably ODBC driver too.

How to fix

Moving the path of 11.2 XE bin to the end of the PATH variable fixed the problem. Presumably also removing the 11.2 XE path would have worked.

I don’t know if there are going to be other ramifications of changing this path variable around (presumably XE would start hitting 11.1 binaries??), but it fixed my immediate problem both with TNSPing and the ODBC queries.

Screenshot

September 16, 2011

Friday miscellany

Filed under: obiee — rmoff @ 11:24

September 13, 2011

DBMS_STATS – GATHER AUTO

Filed under: dbms_stats, oracle — rmoff @ 17:28

In Oracle 11g, the DBMS_STATS procedure GATHER_SCHEMA_STATS takes a parameter ‘options’ which defines the scope of the objects processed by the procedure call, as well as the action. It can be either GATHER or LIST (gather the stats, or list out the objects to be touched, respectively), and AUTO, STALE or EMPTY (defining the object selection to process).

  • GATHER on its own will gather stats on all objects in the schema
  • GATHER EMPTY / LIST EMPTY is self-explanatory – objects with no statistics.
  • GATHER STALE / LIST STALE is pretty obvious too – objects that have stale statistics (i.e. have had 10% change to them since statistics were last gathered). NB this 10% can be changed at an object/schema/DB level.
  • However, the documentation is ambiguous as to the precise function of GATHER AUTO / LIST AUTO.

There’s even a MOS note, “Differences between GATHER STALE and GATHER AUTO (Doc ID 228186.1)”, which strangely enough – given the precision of its title – doesn’t really explain the difference.

I’m quite fastidious about these things, particular in the documentation which I believe ought to be beyond fault. The frustrating thing for me is the sprinkling of fairy dust approach to describing the parameter:

  • “Oracle implicitly determines which objects” — ok, but how does it “implicitly determine”, what algorithm sits behind it?
  • “Oracle[…]determines how to gather” — does it intelligently determine how to gather the stats for each object’s characteristics, or does it passively fallback to the defaults? There’s a difference, since one is a good starting point and the other would be in theory an ideal.

Why does this matter? Because statistics matter so much, and so a stats gathering strategy that is accurate and efficient is important. We can only do this if we understand exactly what the product is doing. GIGO, and all that.

Reading, and re-reading, the documentation, I think the explanation is this:

  • GATHER AUTO gathers stats on objects with stats which are either STALE or EMPTY, i.e. the combined object list of
    • GATHER STALE
    • GATHER EMPTY
  • GATHER AUTO automagically defines all the other parameters relating to how the statistics are gathered – method_opt, estimate_percent, etc. User-specified values for these parameters are just ignored.

I’ve raised an SR to try and get proper clarification, and will update here if/when I find out.

UPDATE Oracle confirmed in an SR that “Gather AUTO Processes stale objects + objects without statistics (empty)”

Note Doc ID 1073120.1 which details method_opt that will be used in GATHER AUTO.

Finally, don’t forget that representative statistics != non-stale statistics. None other than Ask Tom points this out.

Just because statistics are not “stale”, doesn’t mean that are representative of your data. You should always understand your data and make sure you’re giving the CBO the most accurate information you can about the data.

September 12, 2011

Using preupgrade to upgrade Fedora 14 to Fedora 15 – proxy errors

Filed under: fedora, linux — rmoff @ 09:26

When using preupgrade to upgrade an existing Fedora 14 installation to Fedora 15, the following two errors were encountered:

  • Failed to fetch release info
  • No groups available in any repository

The box sits on a network behind a proxy out to the web.

The resolution was to make sure that environment variables http_proxy and https_proxy are set:

export http_proxy=http://user:password@proxyserver:port
export https_proxy=http://user:password@proxyserver:port

Make sure you do this from the user from which you run preupgrade.

Update

The upgrade is kapput. On reboot I get:
The root for the previously installed system was not found

Lots of hits on the bug database but none resolving.
So still stuck on F14 until I get chance to resolve this, probably just a clean install.

Update 2

I’ve successfully upgraded two other F14 installations to F15 using preupgrade, so the problems above must be unique to the installation in question.

September 8, 2011

Labelling Time axes in Excel

Filed under: Excel, hack, visualisation — rmoff @ 09:53

Excel may send chills down the spine of us when we hear users talking about its [ab]use, but it has its place in the toolset. For my money, it is a very good tool for knocking out graphs which look decent. Of course, rrdtool is my geek tool of choice for dynamic long-term graphing, but when doing scratch PoC work, I normally fall back to Excel.

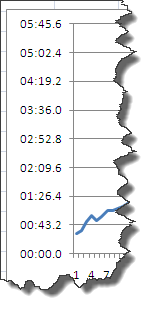
One thing which has frustrated me over time is, well, time, and Excel’s handling thereof. How many times (these puns are getting tiresome already) have you seen an axis like this and gnashed your teeth?

Excel's default labelling of time axes sucks

Looking at the axis options shows some decimals, with no apparent bearing on the times shown on the axis:

By virtue of using Excel for quick ‘n dirty graphing, I normally don’t have the time to figure this out properly. I finally cracked, and I’m glad I did. The answer is very simple.

Time’s in Excel are based on fractions of 1 day. So, with a number of 1 = 24 hours, we can work backwards:

  • 1/2 is going to be half a day, twelve hours = 0.5
  • 1/24 = one hour = 0.04166666666667
  • 1/24/2 = Half an hour = 0.02083333333333
  • 1/24/2/2 = Quarter of an hour = 0.010416666666666667
  • 1/24/60 = One minute = 0.000694444444

This is a good example of understandable backend functionality (storing times as a plain number) ought to be shielded from the end user, and the interface design has fallen one step short. Excel knows the data is Time, and good interface would at the very least offer the option to define axes in terms of time, if not hide the decimals entirely.

Still, making use of what we have, we can still get Excel to behave, it’s just a bit labourious:
You want a graph with a maximum of 1 hour, major lines every fifteen minutes, and minor at 5 minutes? No problem.

Sensible time axis labelling in Excel

So next time you’re graphing a time series in Excel, fire up Calc and work out your fractions, for some proper time axis labelling.

Older Posts »

Create a free website or blog at WordPress.com.